


Latest topics
Who is online?
In total there are 2 users online :: 0 Registered, 0 Hidden and 2 Guests None
Most users ever online was 63 on Sun Apr 18, 2021 3:37 am
A Kimo Force Photoshop Tutorial For Dummies
2 posters
Page 1 of 1

A Kimo Force Photoshop Tutorial For Dummies
![]() by Kimo Force Mon Dec 19, 2011 6:28 pm
by Kimo Force Mon Dec 19, 2011 6:28 pm
A Kimo Force Photoshop Tutorial For Dummies
Chapter I: The Mother of all Introductions
What is GFX?
GFX is the short form of "Graphics", which imply the use of photo-manipulating software to create special digital artwork which ordinary artists cannot produce ,while using other digital images drawn or not as assists. Unlike most other forms of art, GFX is 1% talent and 99% hard work. GFX stands for about most digital arts, but it is mainly used to refer to the art of creating signatures, banners, userbars, and other items used on forums. However, GFX too has its own rules which artists need to stick to for better results. Allow me to show you with examples from my gallery.

This was created about a year ago. As you can see, there is absolutely no flow or border. The text is too large. The render does not blend in. In other words, none of the rules apply.

As for this one, the rules are somehow present and noticeable. The render fits, and so does everything else. Most of you will agree that this one is much better than the one above.
Which programs do I need?
The most commonly used programs for GFX (and possibly the only ones out there) are Gimp and Photoshop. Gimp is much simpler than its brother, and is for free. It cannot deliver the same quality, but is still an effective tool. Photoshop has it all: effects, filters, layer options, etc. The downfall is its massive size and cost. However, it is still possible to download it off the internet for free if you give it a search. Do note that this tutorial will be based on the schematics of Adobe Photoshop, and in contrast, many steps will not be available for Gimp.
Chapter II: Rules to Professional Designing
What are these rules?
Like I explained before, every art must have rules, including GFX. Only skill will determine how effective a rule is being followed by the artist, and may require constant practice. Without further ado, here is what all GFX artists much represent:
• Render
• Text
• Background
• Effects
• Flow
• Focus
• Shadows
• Light source
• Blending
• Borders
Render
What is a render?
A render is the image used to center a signature and that which is used as a pivot to bend all the other rules around. Many believe it to be the most vital aspect of a signature. Not all renders can be used as they must show a certain flow, and must not be too large in width or height in order for it to still remain as a pivot and not to cover most of the signature. The parts which requires focus must be usable. This is determined by logical thinking before acting out.

This cannot be used as a render. The focus must be on the Spartan warrior and the sword, but the large shield is in the way, which may completely ruin the signature.

This cannot be used as a render. His head is too small, and his body is too big to fit in. There are clouds at the bottom too, but even if there were none, the head must be extremely tiny to show up in a signature.

Again, the prince is closed up to degrees beyond manipulation. It would only cover up nearly half the signature. A quick use of erasers could help, but it would still look terrible.

This render is alright, but slightly large and it does not show any visible signs of flow. How he has his back faced to us does not add up to the help.

This render is perfect. There are no items in the way (probably the sword, but that can be taken care of with a use of erasers) and it shows motion. Ideal for the simplest kinds of flow.
So as you can see, this is how we classify renders. Of course, we may not all agree together on a certain render because as I explained, it all comes down to logical thinking. If you can somehow find a way to use difficult renders, good for you. As a heads up, watch out for renders with too much space between the sections, such as a large gap between the arms and the body, but if they are completely far apart, then no worries. Of course, if a render is too large, but still worth it, you can always re-size it through Edit > Transform > Scale. Hold down the Shift button to keep the size ratio constant while resizing.
What if I find an image which I would like to use, but it is not rendered?
That is not an issue. You may render it yourself. I once explained how it may be done using the Lasso tools, but I realized that the Pen tool gives off better yet slower results. You can always remove and add anchors with such ease, or go back a few steps to correct something. After lining around the render, right-click on the line you created through the Pen tool and select "Create Selection" or any other similar option. This allows you to transform your line into a selection to move the render, or you could right-click, select "Select Inverse", and delete everything which is not related to your render. Be careful of renders with openings in the arm or legs; you must also remove the remainders of backgrounds.
Note that the image must not be by an artist who has disallowed the use of his work. If it is official work from popular Japanese Animation, video-games, and albums, or if the artist is unknown or unreachable by all sorts of means (if the artist has an account open to the public, the he/she is reachable), you may render those since the owners have not stated any copyright infringement agreements for improper use (many consider GFX to be "plagiarism" since it is not fully-created by the artist, but cannot apprehend the art itself). If, however, an image is drawn by an artist which was uploaded to the internet, such as most artists on deviantArt, you must ask for permission first. You can check by seeing if that image is being repeated several times on image search engines, or if it was already rendered before.
Is it possible to not use renders?
Only in photography and typography arts. Photography deals with showing landscapes while typography requires vectors and other effects which may be wrapped around text (text does not apply as a render).
Text
What is text?
Text is an additional aspect added to the signature to spice it up by giving a bit of humor, emotions, or just to improve the appearance of the signature. It has many purposes to be there that we do not know of. It could be the biggest uprising or the greatest downfall of a signature depending on how well it is being used.
Where do I place text?
Even text has its own rules in terms of placement. Many beginner artists assume that text at the bottom right or left makes a signature look good, but that is incorrect. There are certain areas where text can be placed. Here is an example to look at:

Now these red lines show where exactly can you place text. It must be in a zone near to the intersection of a horizontal line with a vertical one. It does not have to touch it, but it must be at least near to it, and not nudged to the very side of the signature. The perfect way to practice text placement is to use guides. Access those through View > New guide. Use the following values:
• Horizontal 33%
• Horizontal 66%
• Vertical 33%
• Vertical 66%
That way, you will easily be able to get the hang of text placement. Guides do not appear if you happened to save your work as a .png, .gif or .jpg file, but will only appear in the .psd itself You may still remove it through View > Clear guides. It takes some practice, but as soon as you know your basics, you will not require the assist of guides.
What should my text look like?
Text may appear in any form you like, but you must not use extremely bizarre fonts, mainly Gothic, horror and archaic. Most techno and urban fonts fit in neatly, but it is a matter of skill. The complexity for text is open, but do not overdo it.

For example, this signature has simple text, but it also has white techno brush strokes at the back to give it a decent appearance.

This signature has quite the complex text, again with techno brushes. However, this all fits in.

This signature has plain text, but instead, it is rotated and aligned accordingly to the flow, with shadow effects to improve quality.
So as you can see, text comes in all sorts of forms. There are a few blending options which can only be used, and others which cannot. Here is the best combination:
• The layer stroking is set to 1 pixel.
• No color or pattern overlays are added. If you wish, you may add a gradient overlay with a low opacity of two values being of the same color, but with different concentrations or darkness. For instance, blue and dark blue.
• Never add satin, contour, texture, bevel and emboss. However, you may still add the latter ONLY if it is barely visible, and the values are set to the utmost minimum.
Does my signature require to have text?
Not precisely. Many signatures appear better without text.
Background
What is a background?
A background is the base to build any signature. It helps attain opacity for the signature and may even boost effects if used in a correct manner. Now unlike most other aspects of GFX which come with their own rules, backgrounds have none. It could be plain white, or plain black. It could be a cloud render obtained through Fliter > Render> Cloud, or a smudging of the render duplicated into three layers all set to Overlay, Color/Linear Dodge, and Normal, set in that order accordingly. It could even be a C4D background set to Luminosity with a layer specifically made for colors behind it. Just do what you have to do with the background.
Can my signature go without a background?
Can you build an apartment without the iron rods to hold everything together? Of course not! The very same applies for GFX.
Effects
What are effects?
Effects are built around the render of a signature which either contribute to the signature build, hide unwanted elements, or help in showing and boosting flow.
Effects take on many forms, but the most common of all are C4D effects, which are metallic shapes created using 3D programs solely for GFX. Other effects include bubbles, vectors, brushes, etc. Some stocks are also used for effect purposes, especially Star stream stocks or cloud stocks.
Effects or layers may also be altered using the Filter tab. The most commonly used are Blur, Distort, Render and Sharpen. There are several options one may choose from, so take your pick.
How are effects used?
It takes quite the practice to get a hoof at it, but the results sure are fruity. Sometimes, you could even use the Ocean Ripple procedure through Filter > Distort > Ocean Ripple and set the blending option for the effect layer to Color Dodge. You may even read other online tutorials to understand more about it.
Must I always use effects?
The odds are tough, but yes, it is possible. Much easier if you can have your render cover most of the signature.
Focus
What is focus?
Focus is what determines the depth of a signature through the blurriness or the sharpness of a layer. This is very important to be able to give your signature a realistic touch. It is important to sharpen the render or slightly blur the background, just so the render stands out.
However, if a render has a hoof or limp outstretched, it must be left alone and not sharpened. Quite easy to get right if one knows what to do.
How can I obtain focus?
Basically, duplicate the render layer and set the opacity for the duplicate to 0%. Next, go to Filter > Sharpen > Sharpen, and slowly increase the opacity of the sharpened duplicate. You need to keep your renders away from over-sharpening at all costs. If the render has an opacity of 100% when sharpened, it could trick your eyes into thinking that the render is blurred when you attempt to lower the opacity.
I can do without focus, right?
No, you simply cannot. Focus must be obtained for the signature to appeal nicely.
Shadows
What is a shadow in GFX?
Shadows help determine from where the light source is coming from, or boost the signature focus by forcing the light source to focus on what is important. Most artists prefer to add shadows to the sides to help control the color concentration in certain situations.
How can I make my own shadows?
There is not much to say about shadows, but layers offering shadows are easy to obtain. First of all, use the Paint Bucket tool on a new empty layer with the color set to black. Then, set your eraser to a size which is slightly larger than your signature width, and set the strength to 0%. Erase the middle section of that layer, and continue pressing if it still makes the signature much darker, until you have a not-too-dark shadow layer you are satisfied with. Optionally, you can use a smaller eraser to remove the extra unwanted bits without having to remove a whole chunk.
How about no shadows?
There is a penalty for not using shadows, and that is a disorganized signature. Shadows are extremely vital for a decent signature.
Light source
What is a light source?
A light source is what wraps shadows, focus, and the effects all together into one bundle. A light source shows the viewer from where the light comes from in a signature. Its role is of great importance that it is also vital in many other forms of art. Light sources add a hint of reality to artworks, and may possibly affect the blending options.
Most light source layers are placed above other layers due to their ability to easily blend in an environment. They consist of a single click from a round and fading brush with a white color, with a lowered opacity. The layer is enlarged so that it covers a larger area in the signature. Light sources are to be placed up high on top of the signature, and not at the bottom since it leads to utter nonsense.
How do I use light sources?
To create a light source layer, simply grab your brush and set the first main color to white. Set the brush to a small size and the strength to 0%. Now go to Edit > Transform > Scale, and enlarge your layer to your liking. Afterward, drag it up high until it fits in. Here are a few notes you must look out for:
• When using the brush, be careful so that it does not reach the upper and lower bounds of the signature, and creates a square-like layer. In case it happens, undo and try again.
• The light source must never completely cover the face of the render. Partially, yes, but do not use the light source directly and only use the not-so-opaque side.
• Avoid enlarging the light source to enormous degrees for it to cover most, of not all, of the upper bound of the signature. Remember that is adds reality to the signature.
Would it be OK if I discarded the light source?
Preferably not to; it always enhances a signature by quite the mile.
Blending
What is this blending you speak of?
Blending allows everything in your signature to neatly fit inside the canvas, and it comes in all kinds of forms. Without blending, the entire signature looks out of place, and rather bland. Blending is applied on everything we have created so far, so be careful while adjusting; it could terribly go out of hoof.
Blending can come in all sorts and ways. Allow me to break it down for you.
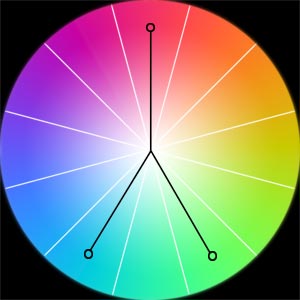
Color Wheel
The Color Wheel allows an artist to determine a color scheme for the signature. Renders may sometimes help pick the scheme too, but few can force a blending color over the render itself. Allow me to explain some of the available choices for the Color Wheel.

Monochromatic
You honestly want to stay away from this as much as possible. No matter how outstanding your signature may be, a Monochromatic style of color will only hurt it regardless. You can still use it, but do not overdo it.

Analogous
This defines a color scheme in which the three chosen colors are near one another on the Color Wheel. Perfect for freshman and gives off perfect results.

Complementary
Using two colors which are completely opposite. Great for signatures with loads of variety.
Split Complementary
Similar to the latter, but instead, one of the sides is split into two and instead chooses colors which are close to the original. The undivided color is used as a main. A little advanced, but gives pleasing results if used correctly.

Triad
Three dissimilar colors very far apart being used. How easy it is to use depends on the signature itself.
Flow
Pictures need to move in order to show some life in it. Flow is what directs the movement of a signature. It is not visible, but rather an aspect which is felt or imagined. This is obtained through the vision of the artist in where he imagines how his signature will look like.
Flow can appear in many ways as long as it is clear for the viewer. The effects help draw the flow, so pay attention to how you add up your effects.
Unidirectional
The flow is in one direction and cannot apply in reverse. It does not rely on the render.


Single Body Tug
The flow is one direction, and relies on the render to build up the flow. The flow can still apply backwards too, in a way which makes it seem that the render is being pulled away or the flow is using the render as a pivot.


Double Body Tug
The same as Single Body Tug, but the flow is in two directions. Both directions must be slightly near one another.

Remember that you will need to adjust your lighting according to flow too, and that includes everything else.
Depth
Depth controls how far or close an object is in a signature. Mostly, you would want the signature to focus on your render body while leaving out some of the hard-to-spot elements behind and the background slightly blurred. Sometimes, the burn tool is used to strengthen shadows, or perhaps even brushes to add lighting in certain areas or remove it.
The sides of renders are smudged in order to acquire even greater depth, but not all sides are smudged; parts which stand out, such as face, arms and upper chest, should remain with no smudging. Fortunately, you may still duplicate the render and smudge the sides for the lower layer so that it does not eat away part of the render.
Usually, a very small brush of size 7 pixels is used with the Smudge Tool. You need to adjust your brush for it via the Brush Tab. Go to Window and tick it. Make sure that it looks something similar to the brush with these settings.


Blending Options
Blending Options sets the layer in a way in which the artist wants it to be seen in. There are several kinds of Blending Options to choose from, and each plays its part. Here is a list of the most popular:
• Normal: Used for renders, certain C4D effects, or anything else which stands out.
• Screen: Used for certain effects which either have a black background in addition to other options to avoid ruining the layer using a rendering tool.
• Overlay/Soft Light: If a smudge layer is too dilute, the layer could be duplicated with the upper layer set to smudge. Some effects may be set to these settings as well.
• Color Dodge: Similar to the Screen option, but makes the colors stand out more.
• Linear Dodge (Add): The same as Color Dodge, but focuses on lighting more than color.
• Hue: For effects which you do not want to appear, but would like to use their color scheme.
• Luminosity: If you would like to use a background with an incorrect color scheme, you can set a layer behind it with the colors you would prefer to use and set the background to Luminosity. It will keep the layer as it is, but it will not preserve its color; instead, it will use that of the layer underneath.
Adjustment Layers
Still not satisfied? Adjustment Layers have got you covered. They provide over-the-top sources for even better blending to be added to your signature. Everything you need is there. To access, go to Layer > New Adjustment Layer, and pick your favorites. Here is a list of the ones to use:
• Gradient Map: Gradient Maps help pick the color scheme for your signature, so you might want to spend some extra time with these. They are extremely versatile to use, but do note that not all gradients are to be used. However, if you do not wish to have your Gradient Map control your color scheme and leave that for the Color Balance, I suggest keeping the Gradient Map on Normal at an opacity of 10 or less.
• Color Balance: Allows you to gain more control over the color scheme, or even define it. Try not to adjust it too greatly to stay on the safe side.
• Photo Filter: Adds a tinted layer to your signature. Useful at some points.
• Hue/Saturation: Controls Hue, Saturation, and Lighting. A basic tool to use.
• Vibrance: Alters the saturation and vibrancy of the colors. Gives better results than the Hue/Saturation layer.
• Levels: Controls lighting. Requires a sleight of hoof as grave changes could turn horribly. Try to avoid this tool unless if you must.
• Curves: Controls lighting as well. Much harder and advanced than the Levels tool. Not ideal to use.
• Black and White: Setting the layer to Normal will allow you to create a gray scale signature, but set the Blending Options to Luminosity and the colors will remain the same. This tool affects the lighting and concentration of each color. One of the best tools known to artists.
Do I really need to add Blendings?
Of course! There is no argument in that.
Borders
What do Borders do?
When you are all set, borders represent the finishing touches added to any signature. It is the black or white line around a signature. Borders help keep items in check so it appeals to the eye, or it enhances your signature even more.
The great thing about borders is its versatility, but one must assure that it does not distract the viewer by being very bright, complex, or out-of-place. A border is only a finishing touch; the signature could very well do without it.
How do I use Borders?
Create a new layer atop all the others. Hit Ctrl+Alt+Shift+E, or go to Image > Apply Image. Head over to Edit > Stroke. Set the border to whichever size as long as it is not too large, and pick any color, preferably black.
For more advanced borders, you could repeat while using a large border size, such as 15-20 pixels. Then, grab the Rectangle Marque Tool and select the entire signature while leaving the border lines you would like to keep, for example, the upper and lower borders. Hit delete and you are done.
Can I forgot about Borders?
There is nothing wrong with that, but for better conclusions, stick to them.
Chapter III: Fields of Graphic Arts
Now like any other forms of art, GFX has it own fields and sections which you can explore, and the best of all is that you can diversify as much as you want. This is when that 1% of skill comes in handy.
What is rather impressive is that one could even create his own unique style or pattern, or set bases to look back at when working. All in all, GFX is extremely varied in all kinds of ways. Allow me to introduce you to a few styles I have discovered and attempted among the years:
Abstract C4D
Abstract C4D is the most common of all styles, where the user deals with several C4D effects, and may also include vectors. What makes this style special is how simple it is to make a signature look good, and not to mention the fact that you can twist this style the most to your own liking.


Vertical Abstract
Vertical Abstract is the twin sister of Abstract C4D, the only difference being the orientation of the signature, which is shown in a portrait form instead of the usual landscape view. This allows an artist to express a render more vividly as it shows more areas which are commonly hidden in horizontal signatures. The procedure is the same but with minor differences.


Smudge
Smudge signatures deal with the idea of smudging and discarding C4D effects and such to give more room to smudging. Quite simple, but getting it right is tough. I personally do not enjoy Smudge signatures, but others with dissimilar tastes may. Now I may not be the best when it comes this field, but I have tried at some point. However, all of my Smudge signature do contain C4D effects that have been distorted using the Ocean Ripple filter. You might want to look up some other Smudge signatures on the web to achieve a better understanding.


Scenery Manipulation
These signatures involve using an image as a background and bending it to your liking. It could be a poster, a photograph, or anything as long as it shows a scene or canvas behind. You can create effects using brushes and text, but absolutely no C4D or vectors. Usually, gradient maps are involved to tamper with the signature theme and such.


Of course, you can also create your own styles as well. Here are a few I came up with myself:
C4D Wave
Basically another excuse for Abstract C4D but this time, the C4D effects are used to draw a wave. I have earned second place in a GFX competition once with a signature that will be shown below. However, the downfall is that they are extremely difficult and complex as they can only apply on very few renders.

Grayscale Abstract
The background is left blank white with the render desaturated and devoid from all color. Only the C4D effects, text, and vectors, are given a single color scheme. Monochromatic styles work best for these kinds of signatures. Usually, they are aimed at renders which show motion, such as running, leaping, walking, etc., but stationary renders are fine as well.


Unfortunately, these are not all the styles available. There will be many many more invented by other artists, which are passed on to others. Your job is to hunt them down and look for more answers.
Chapter IV: Tools of the Trade
Nothing can be made without the use of tools. For one to master GFX, you must learn and accustom yourself to these instruments. It takes time to learn them all on your own, but receiving help could speed up the process.
Of course, to access more effects, you will need to either hold down the left mouse button onto the button or right-click and select the tool you would like to use. Spaces which show a small black arrow to the right bottom have more than one tool you may use.
Here I will explain the tools you will need to use:
• Move Tool: Shown as a black pointer. This allows you to move layers across your signature.
• Marquee Tools: For selecting a certain portion of a layer. This allows you to play around with that part only or you may move it to a whole new layer. There are four different Marquee tools to use.
• Lasso Tools: For cropping layers. Not recommended since you already have he pen tool, but you may still use it if you wish. There is the ordinary Lasso tool, the Polygonal Lasso tool, and the Magnetic Lasso tool which moves according to color and lighting.
• Quick-Selection and Magic Wand tools: Selects certain areas from a layer according to color. Not very efficient as they both tend to leave excess pixels behind which may worsen a render, but go ahead with the Magic Wand if the render is already cropped with a white background.
• Crop Tool: Allows you to crop the signature by removing some of the sides. Helpful if the dimensions are too big.
• Eyedropper Tool: If you would like to pick a color found on a render or a C4D effect and you want the exact thing, use this tool to select that color by clicking on the area.
• Brush: You will need this in Abstract C4D signatures especially as it helps in adding effects. You may also use it for text via certain special brushes.
• Eraser Tool: A very versatile instrument. Can help in all sorts of ways by rubbing out all the unnecessary parts.
• Fill Tools: Contains the Paint Bucket and Gradient Tools. Used for filling in gaps with colors and gradients.
• Smudge Tool: Used in smudging renders and such.
• Burn Tool: Adds contrast to dark areas and lowers lighting. Used on renders. Very helpful in controlling flow and lighting
• Pen Tool: Used by actual artists during inking, but is used in GFX for cropping and selecting.
• Text Tool: Allows you to insert text.
• Zoom Tool: Allows you to zoom in or zoom out. Does nothing to the signature, but very effective when working on a piece.
Chapter V: On The Run
If you are still not sure about yourself after giving this tutorial a good read, I worked on this new signature using a render of Jin from the MMO, Grand Chase, and took snapshots after each move made. It may be a little rushed, so it will not look as great as the others since I focused on taking snapshots more than working on the signature itself.

I opened a canvas of 420x213.

I placed my render after resizing it so that it may fit in perfectly according to how I pictured the signature.

I duplicated the render and smudged the lower one around a bit.

I duplicated the smudge layer twice so that I had three smudge layers. I set the very first one on top to Overlay, the one beneath to Color Dodge, and the last in line was kept at Normal.

I right-clicked on the empty white background layer and selected "Layer from Background". Next, I used a gradient map of red and orange as shown.

I added a C4D layer underneath the three smudge layers.

I grabbed a second C4D render and placed it right after the render itself after erasing part of it on the bottom right using a soft eraser.

Added a third C4D render.

And here comes a forth. Mainly to cover up some space on the right.

And a fifth.

And a sixth, but this was in order because something felt out of place due to that empty void at the back.

After finalizing the body, I started working on effects here. I instantly hopped to shadows. I created a new layer and painted it all black. Then, I used a soft eraser to remove the unwanted parts.

I added a light source to indicate where light was coming from, and to add more elements to the signature.

Seeing that I would not touch the content, I added some text so that I would not forget about it later on. Honestly, I chose wrong properties for my text, but that is not the matter at the moment.

I used a gradient map set at an opacity of 17 of colors yellow and orange to blend everything in together. An orange photo filter was used here too.

I adjusted the depth. I sharpened the render and blurred all layers behind the smudge layer.

Again, something felt wrong with that extra space at the back on the top left. I grabbed my black Winter Breeze brush and filled it in with that on a new fresh layer set at the very back atop the smudge layers.

I played with the Color Balance a bit, and this was the best result I obtained.

I decided to add a second shadow layer to even up sides a bit since the new color scheme toppled everything.

I added a Vibrance Adjustment layer. I lowered down Vibrance to -40 and increased the Saturation to +16. I also duplicated one of the C4D layers behind the smudging and made it stand out a bit by placing that duplicate over the smudge layers and erasing any unnecessary bits.

I added a Levels layer and slightly darkened the signature.

Finally, I added a 20-pixel thick border without the sides, and added the Gaussian Blur touch by creating a new layer on top of everything and hitting Ctrl+Alt+Shift+E. I went to Filter > Blur > Gaussian Blur. I lowered the opacity down to 48% and set the layer to Lighten. I erased the bits covering my render.
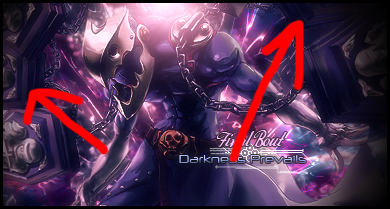
Chapter VI: Final Boss
Well, it seems that you have already read through the whole thing. Sadly, it still does not make you a professional; you require time and determination to improve, and only through trial and error can one unlock an inner potential. It took me three years to reach this level, and counting. I yet have much to learn, and I am not an expert myself even though I did write this entire guide.
If there is a mistake in my tutorial, feel free to correct me. I will give your post or comment a read and check the error. You can reach me anywhere on the internet through my email at KimoForce@gmail.com. You may also reach me on deviantArt or other forums I happen to have joined before.
Chapter VII: Credits
• All signatures used in this tutorial are by me. Please visit my deviantArt page before using to see if they are usable or not.
• For resource packs and renders, visit GFX groups on deviantArt, visit Planetrenders.com, use Google, or any other GFX forums. I recommend Bakarenders.com since an old friend of mine is from there and he happens to mass-produce renders too.
• Fonts for text can be found everywhere, but I personally recommend 1001freefonts.com.
• No links to resource packs have been added to avoid copyright infringement. Sorry.
• I wanted to write seven chapters to indirectly refer to Final Fantasy VII.
• This is my first time writing something so long. Usually, tutorials would take up about 1-3 hours to finish.
• This tutorial took nearly a month to finish. Hoo colt!
• Complain at how I used absolutely no short forms for words and I will stab you with a spoon.
© Kimo Force and World Dueling Academy. All rights reserved. Do not distribute without permission and giving credits.

Kimo Force- Posts : 26
Tolerance : 40
Love : 0
Join date : 2011-11-27
Age : 28
Location : Egypt -

Re: A Kimo Force Photoshop Tutorial For Dummies
![]() by Kumadown Tue Dec 20, 2011 12:31 am
by Kumadown Tue Dec 20, 2011 12:31 am
wow... all i have is gimp to work with xD

Kumadown- Posts : 93
Tolerance : 109
Love : 1
Join date : 2011-11-27
Age : 31
Location : prancing with the ponies
Page 1 of 1
Permissions in this forum:
You cannot reply to topics in this forum|
|
|
» 9.s?n?f Esen 3 Renk Yay?nlar? Cozumleri Geometri
» New Key Hustler-tv 2013 Star Sat Sirius
» I can teach how to play the Nordic decks
» New Brony Website by Me
» Let's all post our schedules here
» this site is the dead. seriously. no mods come on here it looks like,
» So... How's it going?
» Homework help for the younger duelists